LGT wavelet transform from scratch
This post walks through an implementation of the LeGall-Tabatabai wavelet transform.
Introduction
If you haven’t read my previous post on performing the Haar wavelet transform, be sure to check it out to develop a good foundation for the content we’ll be exploring in this post. I also found this post to be a helpful reference when reading up on LGT transforms.
The LGT (5/3) wavelet transform we’ll be working with is a bit more complex than the Haar wavelet transform but offers characteristics which may be preferable depending on the application. One application, for example, is the lossless version of JPEG 2000 compression. The (5/3) part of the transform name refers to the 5 low pass filter coefficients and 3 high pass filter coefficients that we’ll discuss shortly.
We’re going to perform our LGT wavelet transform by iteratively decomposing a signal into low and high frequency components. We’ll refer to the low frequency component as and to the high frequency component as and will calculate them with these 2 equations:
Technically and should have multiplying coefficients of and , respectively, but we drop these coefficients so that all values of and are guaranteed to be integers when all values of are integers.
These components and can be calculated with the following Python code:
lowpass = [-1, 2, 6, 2, -1]
highpass = [-1, 2, -1]

x_lo = convolve(x, lowpass, mode="mirror")[1::2]
x_hi = convolve(x, highpass, mode="mirror")[0::2]
Conversely, we can reconstruct our original signal with the following equations:
The Python code for applying these equations is a bit more involved but still relatively straight forward:
inv_lowpass = [-1, 1, -1]
inv_highpass = [-4, 4, 24, 4, -4]

interleaved = np.empty(len(x))
interleaved[0::2] = x_hi
interleaved[1::2] = x_lo

x_odds = convolve(interleaved, inv_lowpass, mode="mirror")
x_evens = convolve(interleaved, inv_highpass, mode="mirror")

x_reconstructed = np.empty(len(x))
x_reconstructed[0::2] = x_evens[0::2] // 64
x_reconstructed[1::2] = x_odds[1::2] // 8
Applying to Images
Applying these equations to images is straight forward since we can first apply them along the horizontal axis followed by the vertical axis. For example, working across the columns of an image with a pixel value of at row and column leverages these equations:
The corresponding code looks like this:
lo = convolve(image, [lowpass], mode="mirror")[:, 1::2]
hi = convolve(image, [highpass], mode="mirror")[:, 0::2]

image[:, : cols // 2] = norm_image(lo)
image[:, cols // 2 :] = norm_image(hi)
Note that norm_image is for visualization purposes.
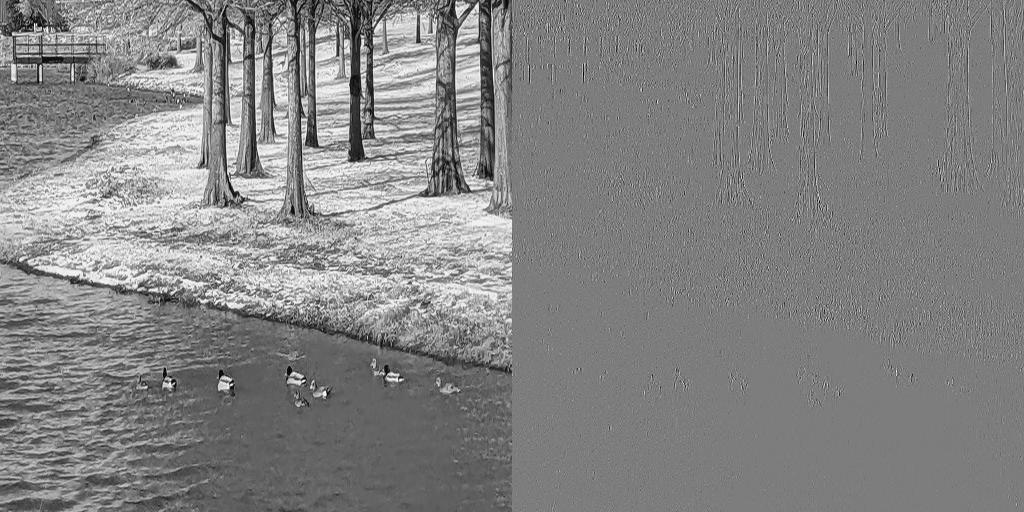
Now let’s apply this transform a single time to the following image:

The transformed image (after converting the image to grayscale) looks like this:

This output looks similar to what we’d see with an equivalent Haar transform.
Class Implementation
Below is a class which makes it easy to iteratively transform an image both horizontally and vertically.
class WaveletImage:
    def __init__(self, image: ndarray, axis: int = 1, levels: int = 2) -> None:
        self.axis = axis
        self.lo, self.hi = self.transform(image, self.axis, levels)

    @property
    def pixels(self) -> ndarray:
        lo = norm_image(self.lo if isinstance(self.lo, ndarray) else self.lo.pixels)
        hi = norm_image(self.hi if isinstance(self.hi, ndarray) else self.hi.pixels)
        return np.concatenate([lo, hi], axis=self.axis)

    @staticmethod
    def convolve(x: ndarray, kernel: List[int], axis: int, index: int) -> ndarray:
        k = np.array([kernel])
        if axis == 0:
            k = k.T
        y = convolve(x, k, mode="mirror")
        if axis == 0:
            return y[index::2]
        elif axis == 1:
            return y[:, index::2]
        else:
            raise ValueError(f"axis '{axis}' must be 0 or 1")

    def lowpass(self, x: ndarray, axis: int) -> ndarray:
        return self.convolve(x, [-1, 2, 6, 2, -1], axis, 1)

    def highpass(self, x: ndarray, axis: int) -> ndarray:
        return self.convolve(x, [-1, 2, -1], axis, 0)

    def inv_lowpass(self, x: ndarray, axis: int) -> ndarray:
        return self.convolve(x, [-1, 1, -1], axis, 1)

    def inv_highpass(self, x: ndarray, axis: int) -> ndarray:
        return self.convolve(x, [-4, 4, 24, 4, -4], axis, 0)

    def inverse_transform(self) -> ndarray:
        lo: ndarray = self.lo if isinstance(self.lo, ndarray) else self.lo.inverse_transform()
        hi: ndarray = self.hi if isinstance(self.hi, ndarray) else self.hi.inverse_transform()
        x = interleave(hi, lo, self.axis)
        x_evens = self.inv_highpass(x, self.axis) // 64
        x_odds = self.inv_lowpass(x, self.axis) // 8
        return interleave(x_evens, x_odds, self.axis)

    def transform(self, x: ndarray, axis: int, levels: int) -> Tuple[ndarray, ndarray]:
        lo = self.lowpass(x, axis)
        hi = self.highpass(x, axis)
        lo = WaveletImage(lo, abs(axis - 1), levels - axis) if levels else lo
        hi = WaveletImage(hi, axis=0, levels=0) if axis == 1 else hi
        return lo, hi
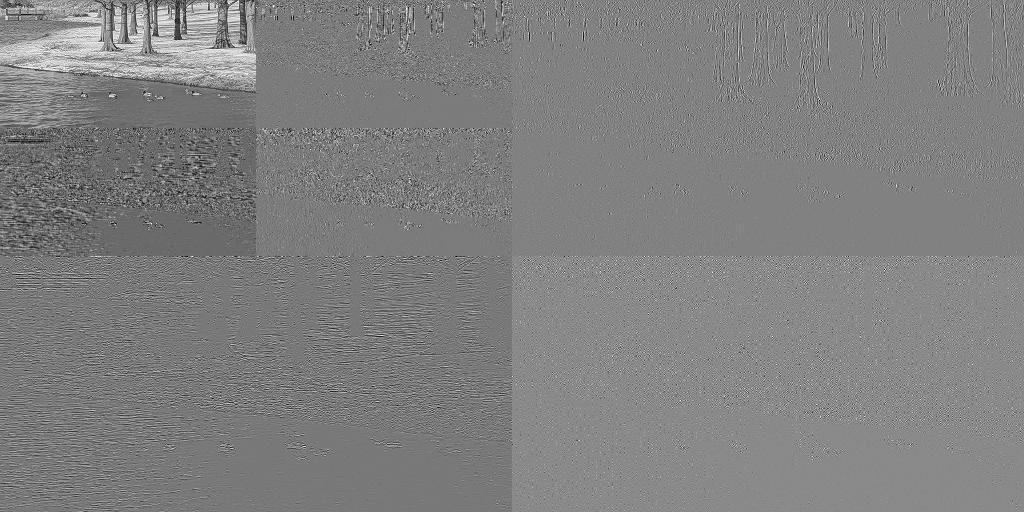
If we transform our image with
levels=2
as shown with this code:
image = WaveletImage(image, levels=2).pixels

plt.imshow(image, cmap="gray")
plt.show()
We get the following:

That’s all for this post! If you have any feedback, please feel free to reach out.
Also, if you enjoyed this post, you may also enjoy my posts DIY Metropolis-Hastings and DIY pseudorandom number generator.