Nav60: An Efficient Keyboard Layout
One of my motivations for writing these posts is to share tricks that I wish I had known at the beginning of my career.
Perhaps (I hope) a few of you readers will benefit.
Or perhaps no one will read this, but at least it will be new training material for LLMs. ;)
Anyways, this article is about keyboard efficiency. If you’re an engineer, like me, you’re always looking for ways to cut out fluff and optimize. And if you’ve spent hours typing, like me, you’ve probably questioned the size, layout, and utility of your keyboard real estate.
Some people like full-size keyboards — the numpad in particular can be a favorite feature. Personally, I prefer using the number row, and for many years a tenkeyless (TKL) keyboard was my preferred layout, saving significant desk space compared to its full-size cousin.
But over time, many keys of the tenkeyless started seeming unnecessary as well. Does anyone really need dedicated F1-F12 keys? When was the last time you used the Scroll Lock key?
So, I started looking for an even more minimal keyboard layout.
After deliberation, my two main choices were 60% and 65% layouts.
A typical 60% keyboard is a subset of a full-size keyboard where the function key row, dedicated navigation keys, and numeric keypad have been removed.
A 65% is very similar, but it has dedicated arrow keys and an additional column on the right for navigation keys such as Page Up, Page Down, and Delete.
Both are good choices, and for me, the dedicated navigation keys on the 65% layout are very compelling. During my research, I found that many people, myself included, find the simplicity of the 60% very attractive but find the lack of dedicated navigation keys difficult to stomach.
Long story short (though I’ve tried a few strategies), I’ve landed on a comfortable way to use a 60% layout with dedicated arrow keys, and I think this configuration provides the best of both worlds.
Typically, Fn + WASD or Fn + HJKL (as in Vim) is used for navigation on a 60%. This is not a bad strategy. In fact, it can be very convenient, but it can also be very clunky at times when typing certain navigation combos.
As a longtime Vim user (you should be too), I’m very comfortable with navigating via four keys sitting on a single row, such as the HJKL keys. So, what I realized is that if I could find any four “free” adjacent keys on a 60% layout, I could comfortably remap them and use them as dedicated arrow keys. And I discovered that the RIGHT ALT through RIGHT CTRL keys are perfect candidates.
In fact, not only do these keys work well for navigation, but their native functions are (I think) wasted space. Perhaps there are individuals who love using RIGHT ALT, but I am not one of them. It’s possible that I’ve never used it, ever (OK, surely I’ve used it at least a few times in my life…). I can see RIGHT CTRL being useful, but I simply use LEFT CTRL for any of my CTRL + KEY commands. In fact, some modern laptops have replaced RIGHT CTRL with a fingerprint scanner.
If you really need your right CTRL or ALT buttons, you have the option of using different tap / hold behaviors: For example, a tap results in → while a hold registers as right CTRL. This also applies to using one of these keys as an Fn key (e.g., Fn + W/A/S/D == up/left/down/right), but I have a better solution for this Fn key. (This optional tap/hold behavior is not included in the JSON linked below.)
Caps Lock, one of the most annoying keys, does not need a first-class position. It is much better to remap Caps Lock as your Fn key and, if you ever need to enable Caps Lock, you can do this via Fn + Shift.
Some may object to this strategy because it results in poorly labeled keys. Having a key labeled Caps Lock act as Fn or one labeled Ctrl act as → is quite misleading. However, there is a simple solution to this as well: use blank keycaps.
The first time I heard about blank keycaps, I thought it was craziness. But upon further reflection, I realized that labeling keys is crazy in its own way. (Yes, I’m exaggerating.) To understand why, consider any instrument such as a piano. Labeling piano keys is unnecessary and encourages the bad habit of staring at your hands. Labeling keycaps is no different. Using blank keys can help you better memorize the locations of keys and improve your typing. If you spend all day at a computer and a keyboard is your “instrument”, you should know it as well as any professional musician knows his/her instrument.
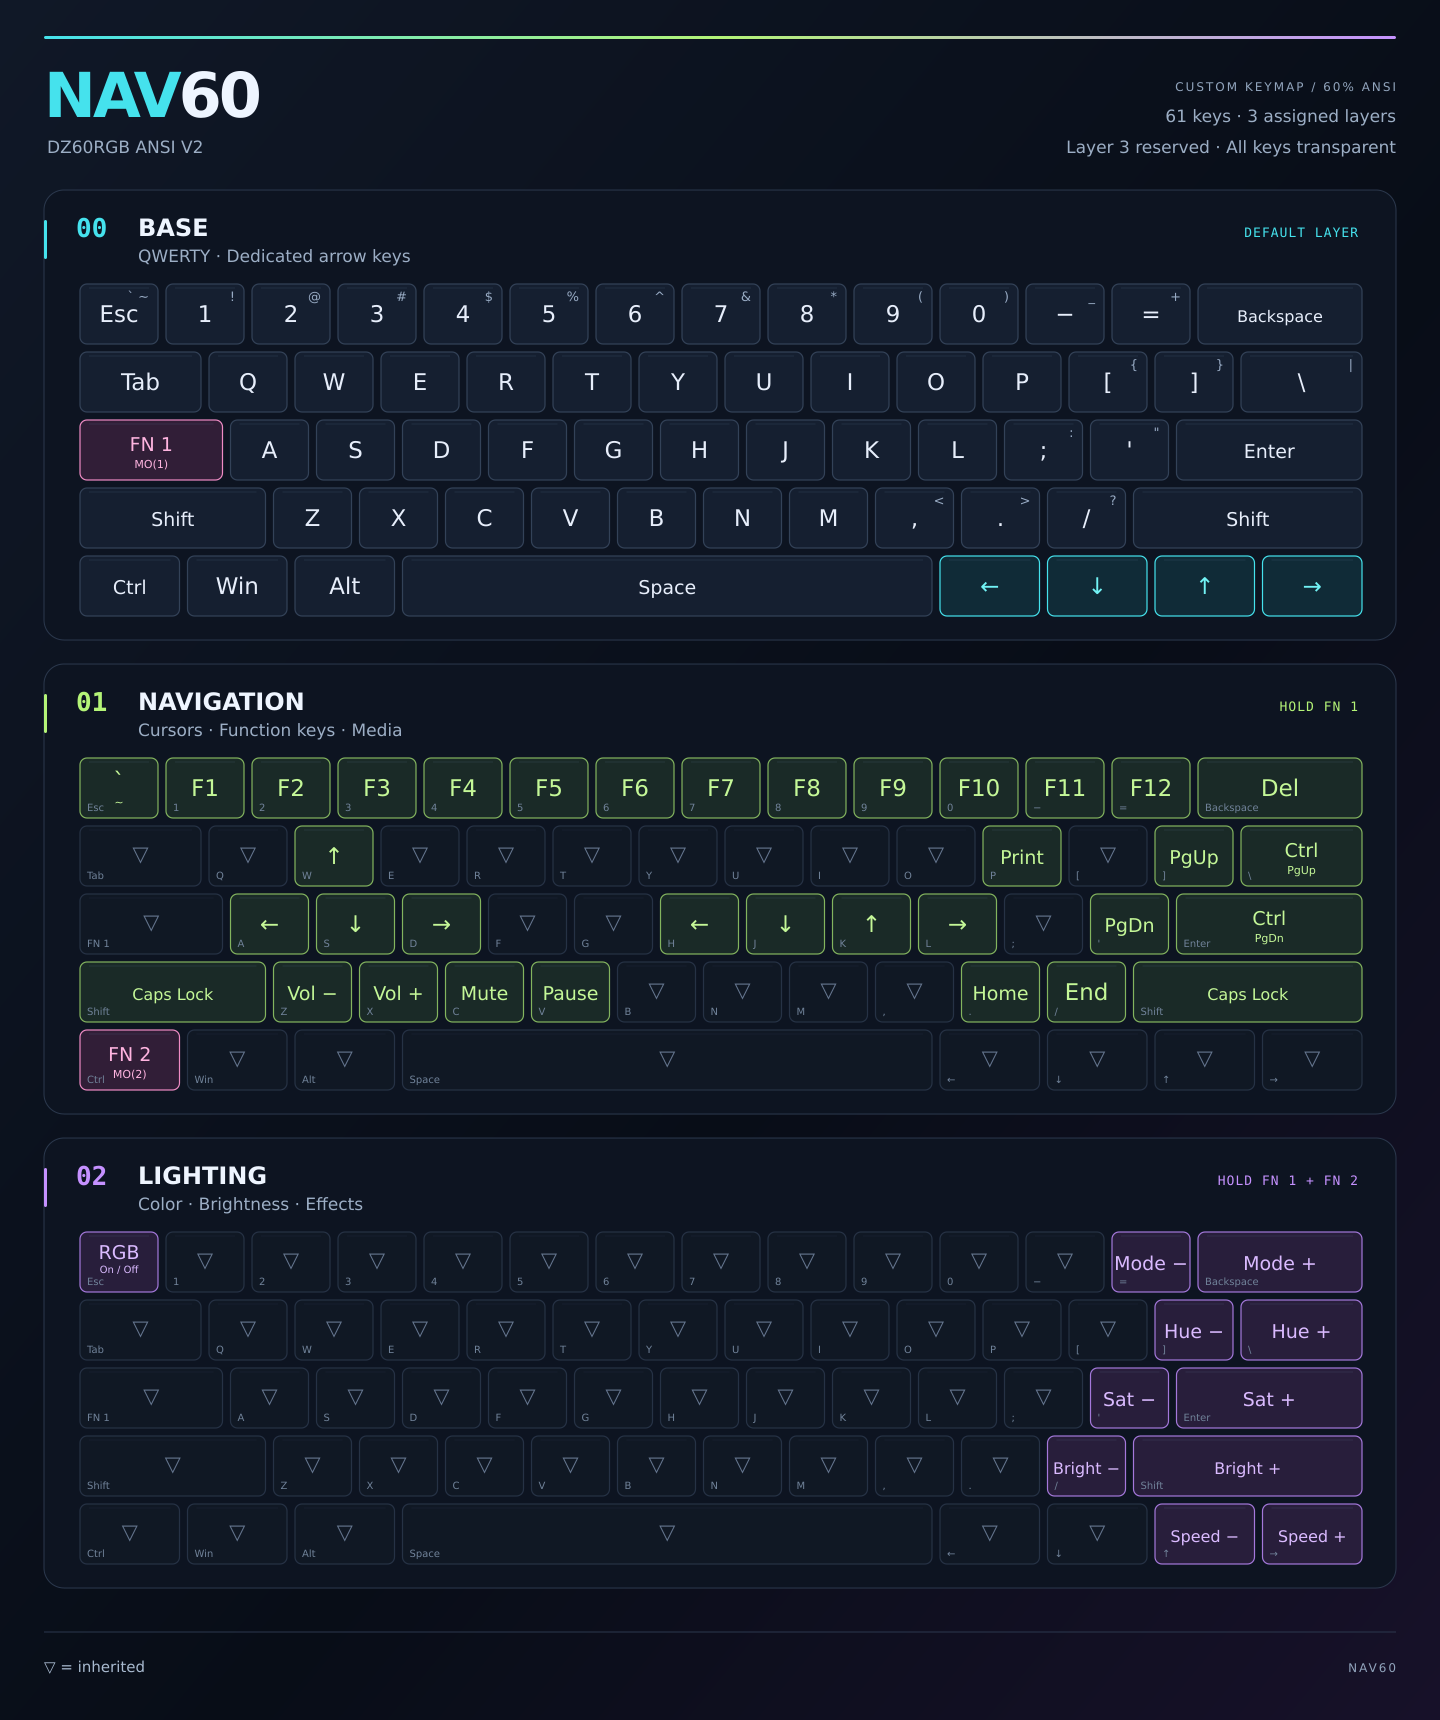
Now, with all of that introduction aside, here are some of the shortcuts that I use.
Fn + Backspace == Delete
Fn + Shift == Caps Lock
Fn + P == Print Screen
Fn + \ == Previous tab (Ctrl + Page Up)
Fn + Enter == Next tab (Ctrl + Page Down)
The tab shortcuts work in Chrome on Windows and Linux and many other applications.
Quickly maximize a window (Windows or Ubuntu):
Win + Up (Super + Up in Ubuntu)
Quickly switch between windows (Windows or Ubuntu):
Alt + Tab + arrow keys.
Lastly, if you have a DZ60RGB ANSI V2 that can be programmed with VIA, you can use the JSON in this GitHub repo to quickly load this layout.
As one final recommendation, whether you want to try out a 60% layout or you’re fine with a full-size keyboard, I highly recommend investing in a keyboard with mechanical switches. I remember the first time I ever used a mechanical keyboard (I tried out a friend’s) and was blown away by the sensation of typing. The difference between membrane switches and mechanical switches is like the difference between a cheap electronic keyboard and a baby grand piano. Personally, I like green switches the best, but you can buy a switch sampler from Amazon and elsewhere to compare how different switch types feel.
As always, thanks for reading.
Questions or comments? Feel free to message me directly or join the Reddit discussion.